Monday, February 20, 2017

教你如何搭建自己的Shadowsocks服务器

来源: 这里


如果你购买的是搬瓦工的VPS,登陆搬瓦工的Client Area,Services—My Services,找到你买的VPS服务,进入KiwiVM控制面板,右侧显示的就是你的VPS的信息,从上至下依次是物理地址,IP地址,SSH端口号,运行状态,操作(开关机,重启),RAM占用,SWAP占用,磁盘占用,流量使用情况(每个月都会刷新),和Linux操作系统版本。


注意!!!不同操作系统下搭建SS服务器方法不同,本文的方法是基于Cent OS 6系统。如果你安装的其他Linux系统(如Debian,Ubuntu等),请自行百度SS安装教程,或点击KiwiVM控制面板左侧的 Install New OS重装Cent OS系统。

1.使用Putty连接VPS。Putty是Windows下的一个免费的SSH连接工具,如下图示


Host Name处填入VPS的IP地址,Port处填入SSH端口号,连接类型选择SSH,点击Open。

用户名:root,密码:KiwiVM面板左侧Rootpassword modification,点击Generate New password后会随机生成一组密码。

2.修改Root账户密码:
登陆root账户后,运行命令passwd root修改root账户密码,以后登录root账户使用该密码。

3.安装SS服务端:
运行命令

yum update
yum install python-setuptools && easy_install pip
pip install shadowsocks

4.配置SS服务端:
新建一个配置文件,运行命令 vi /etc/shadowsocks.json

内容如下

{
"server":"your_server_ip",
"server_port":8388,
"password":"yourpassword",
"timeout":300,
"method":"aes-256-cfb",
"fast_open":false,
"workers": 1
}

代码中各字段的含义:


server:服务器 IP地址 (IPv4/IPv6)
server_port:服务器监听的端口,一般设为80,443等,注意不要设为使用中的端口
password:设置密码,自定义
timeout:超时时间(秒)
method:加密方法,可选择 “aes-256-cfb”, “rc4-md5”等等。推荐使用 “rc4-md5”
fast_open:true 或 false。如果你的服务器 Linux 内核在3.7+,可以开启 fast_open 以降低延迟。
workers:workers数量,默认为 1。

备注:如要你需要分享SS服务给朋友或家人,可以配置多个SS账户,具体可以参考下面的代码。

{
"server":"your_server_ip",
"port_password":{
     "8381":"pass1",
     "8382":"pass2",
     "8383":"pass3",
     "8384":"pass4"
     },
"timeout":60,
"method":"rc4-md5",
"fast_open":false,
"workers":1
}

5.设置Shadowsocks开机自启。
修改rc.local文件,运行命令 vi /etc/rc.local

内容如下

#!/bin/sh
ssserver -c /etc/shadowsocks.json -d start

运行命令 reboot 重启VPS。

6.客户端配置

以Windows客户端为例,进入服务器选项-编辑服务器-添加,各项参数配置如下图示。


其中各项参数按照服务端的配置填入后确定,点击右键-启用系统代理。
其他客户端的配置方法与Windows客户端基本相同。
Read more ...

Friday, February 10, 2017

写给非专业人士看的 Shadowsocks 简介

来源:Here.


long long ago…
在很久很久以前,我们访问各种网站都是简单而直接的,用户的请求通过互联网发送到服务提供方,服务提供方直接将信息反馈给用户。


when evil comes
然后有一天,GFW 就出现了,他像一个收过路费的强盗一样夹在了在用户和服务之间,每当用户需要获取信息,都经过了 GFW,GFW将它不喜欢的内容统统过滤掉,于是客户当触发 GFW 的过滤规则的时候,就会收到 Connection Reset 这样的响应内容,而无法接收到正常的内容。


ssh tunnel
聪明的人们想到了利用境外服务器代理的方法来绕过 GFW 的过滤,其中包含了各种HTTP代理服务、Socks服务、VPN服务… 其中以 ssh tunnel 的方法比较有代表性

1) 首先用户和境外服务器基于 ssh 建立起一条加密的通道 2-3) 用户通过建立起的隧道进行代理,通过 ssh server 向真实的服务发起请求 4-5) 服务通过 ssh server,再通过创建好的隧道返回给用户。


由于 ssh 本身就是基于 RSA 加密技术,所以 GFW 无法从数据传输的过程中的加密数据内容进行关键词分析,避免了被重置链接的问题,但由于创建隧道和数据传输的过程中,ssh 本身的特征是明显的,所以 GFW 一度通过分析连接的特征进行干扰,导致 ssh 存在被定向进行干扰的问题。

shadowsocks
于是 clowwindy 同学分享并开源了他的解决方案

简单理解的话,shadowsocks 是将原来 ssh 创建的 Socks5 协议拆开成 server 端和 client 端,所以下面这个原理图基本上和利用 ssh tunnel 大致类似。

1、6) 客户端发出的请求基于 Socks5 协议跟 ss-local 端进行通讯,由于这个 ss-local 一般是本机或路由器或局域网的其他机器,不经过 GFW,所以解决了上面被 GFW 通过特征分析进行干扰的问题 2、5) ss-local 和 ss-server 两端通过多种可选的加密方法进行通讯,经过 GFW 的时候是常规的TCP包,没有明显的特征码而且 GFW 也无法对通讯数据进行解密 3、4) ss-server 将收到的加密数据进行解密,还原原来的请求,再发送到用户需要访问的服务,获取响应原路返回。
Read more ...

Wednesday, February 1, 2017

在 macOS 上通过 Proxifier + Shadowsocks 同步 Google Drive

转载自高堡杂谈


之前在买 LG 的港版机器时 Google 赠送了 200G 的存储空间,所以平时在用的时候我也是优先使用 Google Drive。唯一的问题是 Google Drive 不支持自定义代理,和 macOS 上常用的 shadowsocks 水土不服。但其实只需要一个名叫 Proxifer 的小 App 将 Socket 代理转换为 http 代理即可解决,这个 App 也有为 Windows 设计的版本。
proxifier-1

Proxifier 配置
Proxifier 的配置颇为简单,只需要在 Proxies 里面加入 Socket5 的代理即可,地址如果没有修改过 ss 的地址就填写 127.0.0.1 端口选择 1080 即可。
proxifier-2

随后就是配置代理规则了,Porxifier 不会自动识别需要代理的 App,你得自己手动添加设置(也可能配置文件可以导出修改),注意不要把应用名称打错就可以了。
proxifier-3
Read more ...

Saturday, October 8, 2016

Convert adf binary to ascii whith GDAL on Mac OS

Link.


brew install gdal --with-python
brew install homebrew/python/numpy

If you get warnings like: Python modules have been installed and Homebrew's site-packages is not in your Python sys.path, so you will not be able to import the modules this formula installed. If you plan to develop with these modules, please run: *****

Just run the script which is given.
Read more ...

Thursday, September 22, 2016

How to enable "Create a Windows 7 install disk" option in Boot Camp Assistant

Link.


1. Find Boot Camp Assistant.app in /Applications/Utilities/ and right click "Show Package Contents".

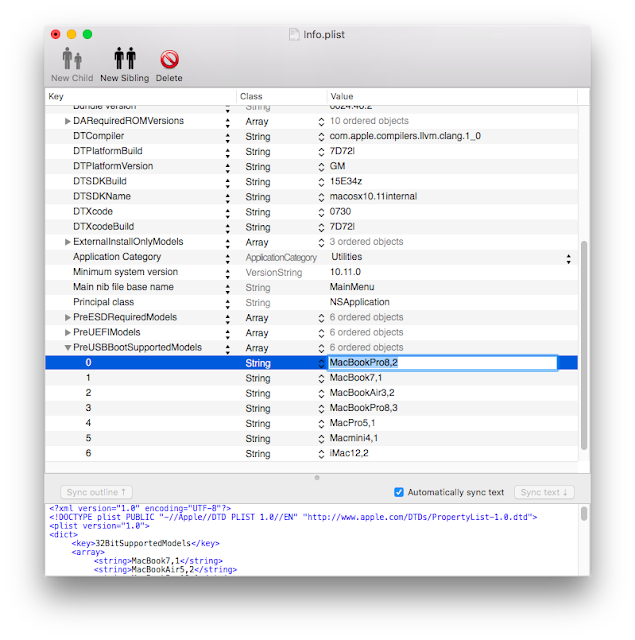
2. Backup the Info.plist in folder Contents and edit Info.plist.

3. Open System Information, copy Model Identifier (e.g. MacBookPro8,2) to the "Info.plist - PreUSBBootSupportedModels"

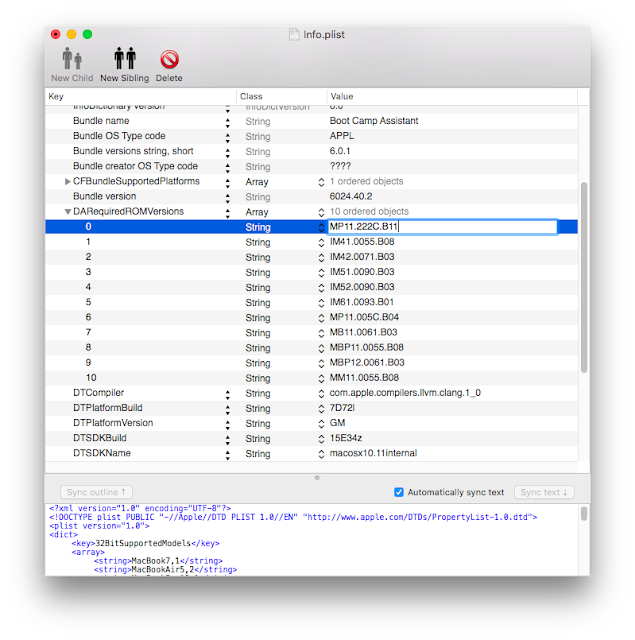
4. Copy the Boot ROM Version (e.g. MP11.222C.B11) from System Information to "Info.plist - DARequiredROMVersions"

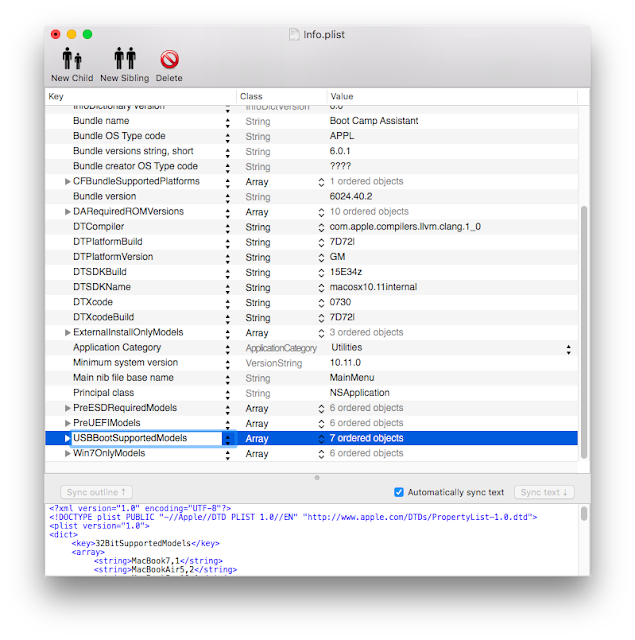
5. Rename "Info.plist - PreUSBBootSupportedModels" to "Info.plist - USBBootSupportedModels".

6. Save it and copy back to the Boot Camp Assistant.app in Contents folder.

To create a bootable USB for windows installation.

1. Open Boot Camp Assistant.app

2. Only check the box for "Create a Windows 7 or later version install disk".

3. Select the iso file and the destination USB driver.
Read more ...

Thursday, July 21, 2016

Turn off automatic attachment preview in Mac Mail App

Link.


Turn off automatic attachment preview in Mail

Mail, by default, provides a preview of attachments in can read, such as graphics and PDF files. However, you can run a command in Terminal to turn this off. Run the following:
defaults write com.apple.mail DisableInlineAttachmentViewing -bool yes

Quit Mail and relaunch it. When you view a message, all attachments will be shown as icons only.

To restore the original functionality, run this command:
defaults write com.apple.mail DisableInlineAttachmentViewing -bool no
Read more ...

Wednesday, June 8, 2016

Mac Word-to-PDF template error: "A footer of section 1 is set outside the printable area of the page. Do you want to continue?"

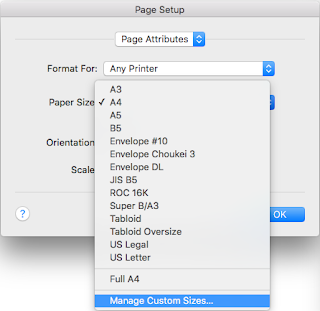
1. File --> Page Setup...

2. Paper Size --> Manage Custom Sizes...


3. Create a New one with the name "Full A4", set margins to 0 mm.
Read more ...

Wednesday, April 6, 2016

NICE PROGRAMMING FONTS

Read more ...

Quick Tip: set-goal-column

Link.


On the surface, it might not sound like editing columns of text is something that happens a lot, but I find myself doing it fairly often. A quick way to enter different values on each line down a column is to use set-goal-column (bound to C-x C-n).

Let’s say we have a block of text like the following comma-separated list. We’d like to enter a different value in the second field of each line. First we position the point on the first line between the two commas. This is at column position 6 (emacs starts counting columns at zero).
Step 1: set-goal-column

Now let’s input our first text field and hit C-n to go to the next line.
Step 2: set-goal-column

It does what you might expect. Because our first field pushed us out to column position 23, when we went to the next line our point was placed at the end of the second line. To enter a new field on line 2, we’ll have to first jump back to column 6 manually. That’s no fun. Let’s start over and use set-goal-column instead.
Step 1: set-goal-column

Now, before we enter our first field, we’ll first hit C-x C-n. Setting a goal column sets the current horizontal position as a goal for C-n and C-p. Let’s see what happens when we re-input our first field and hit C-n.
Step 3: set-goal-column

Perfect. We’re right were we need to be. Quickly, we finish our text entry down the column:
Step 4: set-goal-column

To turn off the goal column, pass a non-nil argument to set-goal-column (i.e. C-u C-x C-n).

Note: When you run set-goal-column for the first time, you’ll receive a warning that the function is disabled. You can either follow the built-in instructions and customizations to enable the function, or you can add the following to your emacs initialization.
(put 'set-goal-column 'disabled nil)
This exercise provided a nice way to manage a column of text with different values on each line. When the task is more repetitive, emacs rectangles come in handy. We’ll make rectangles a future topic of discussion.
Read more ...

Thursday, March 31, 2016

Access efi partition on windows 10

Link.


open cmd as admindisk
diskpart
list disk
select disk 0 "target disk, normally is 0"
list partition
select partition 1 "EFI partition, default:1"
assign letter=b
exit
Task Manager - File - Run New Task - Browse...
Now you can access and change files in EFI partition.
Read more ...

Tuesday, March 22, 2016

Flash Plugin - Keep it up to date and troubleshoot problems

Link.

1. Download the  Flash Player (*.tar.gz)
2. Extract the libflashplayer.so and also the /usr files
3. Copy files to the corresponding location
$ sudo cp libflashplayer.so /usr/lib/mozilla/plugins
$ sudo cp -r usr/* /usr
Read more ...

Monday, March 21, 2016

Install Adobe Reader 9 in Debian (also chinese font)

Install Adobe Reader 9

1. Go to FTP download site on Adobe and download the version you wish to install.
2. Install architecture: i386
sudo dpkg --add-architecture i386
sudo apt-get update
sudo apt-get install libgtk2.0-0:i386 libxml2:i386 libstdc++6:i386
3. Install Adobe Reader which you downloaded
sudo dpkg -i AdbeRdr9*.deb
4. If the installation doesn’t fully complete, you might need to do
sudo apt-get -f install

Install Chinese Font

1. Download Font from here.
2. Unzip and install the font.
tar xvf FontPack910_chs_i486-linux.tar.bz2
cd CHTKIT
sudo ./INSTALL
Read more ...