Friday, September 14, 2012

Hackintosh T420

1. U盘制作
参看这里,首先下载X-Flash。
然后将X-Flash复制到桌面,双击打开安装程序,使其在桌面展开。最后将格式化成HFS+日志系统的U盘拖入X-Flash图标即可。最后可以美化一下,右击U盘点 get info 然后把安装程序里面的狮子图标拖动到U盘信息的左上角。


当然,最后需要替换OSIstall。
替换 mac安装盘目录System/Library/PrivateFrameworks/Install.framework/Frameworks/OSInstall.framework/Versions/A/里的osinstall。

替换mac安装盘目录System/Installation/Packages 里的 osinstall.mpkg

2. FakeSMC设定参看这里

3. HD3000可参看这里
HD3000花屏还可以试试添加EDID,以及display注入。参看这里

4. 电源管理补丁

5. HD3000 集显的机器 显卡id0126 按道理能够直驱的。
但是-v时出现
SNB Framebuffer did not show up
然后跳2下可以进入系统,但是显卡没驱动不能改分辨率,显示显存64M。

如果出现以上情况可以试试,查看
/System/Library/Extensions/AppleIntelSNBGraphicsFB.kext/Contents/info.plist
找到如下内容
01168086 01268086
在前面添加 0x
然后修复权限,重建缓存试试。
我的改过之后就成功驱动了。

6. RTC补丁解决BIOS重置
终端输入

sudo perl -pi -e 's|\x75\x30\x89\xd8|\xeb\x30\x89\xd8|' /System/Library/Extensions/AppleRTC.kext/Contents/MacOS/AppleRTC

7. 解决 Transcript Offline - Buffer Pool Allocate [181000] failed
1. 打开 AppleIntelSNBGraphicsFB 里面 info 文件,将“FBCControl”-“Compression”的值改为‘1’,将“FeatureControl”里面的"FBC"的值改为‘1’,将“FBClientController”栏全部内容删除;

2. 打开 AppleIntelHD3000Graphics 里面 info 文件,IOKitPersonalities 下面Gen6 下面 VRAMMethod 和 VRAMOverride 两项删除。保存后修复权限重建缓存,重启错误解决。


8. 解决smc更新提示
以我的本本为例,和MacBook Pro 8,1的配置比较接近,SMBIOS.plist为MacBook Pro 8,1

http://support.apple.com/kb/HT1237?locale=zh_CN去查看你对应机型的SMC版本和Boot Rom版本并记下来

1、将你的SMBIOS.plist里面的SMbiosversion字段的值的前面部分修改成和Boot Rom版本一致。比如的MacBook Pro 8,1最新的的Boot Rom版本是MBP81.88Z.0047.B27,则修改SMbiosversion字段的值为MBP81.88Z.0047.B27.1104221557;

2、将你的FakeSMC.kext里面的Info.plist的REV值修改成和SMC版本一致,方法参考【變色龍系列三】FakeSMC.kext 設定說明【08/05】。比如MacBook Pro 8,1最新的SMC版本是1.68f98,则rev值为AWgPAACY。

修改好之后保存重启,这两个更新就不在了,其他机型以此类推。
相关dsdt ssdt 以及驱动:

Read more ...

Install TEX/LATEX in Mac OS X

1. Install MacTex based on Texlive.
Download MacTex from here.
or you can also install from MacPorts.

sudo port install texlive
sudo port install texlive-latex-extra

You can see the list of  texlive ports here. Around 99% of the packages are included in texlive-latex-extra.

2. Use Emacs as an editor.

You can down emacs for mac from here.
or install from macports:
sudo port install emacs-app +fullscreen

If you want to use emacs to edit tex file, you have to install auctex or aquamacs.
For installing aquamacs, you can see here.

I am using auctex.

2.1 Download auctex from here.

2.2 Install

./configure --with-emacs=/Applications/Emacs.app/Contents/MacOS/Emacs --with-lispdir=/Applications/Emacs.app/Contents/Resources/site-lisp --with-texmf-dir=/usr/local/texlive/texmf-local

instead this by: (if you used macports)
./configure --with-emacs=/Applications/MacPorts/Emacs.app/Contents/MacOS/Emacs --with-lispdir=/Applications/MacPorts/Emacs.app/Contents/Resources/site-lisp --with-texmf-dir=/usr/local/texlive/texmf-local


in OS X 10.11, if u installed the texlive via macports, the texmf-local location is changed to
/opt/local/share/texmf-local

make

sudo make install

Before do this, maybe you have to install make
go to Xcode Preferences, install Command Line Tools in Downloads.

2.3 load auctex
edit your ~/.emacs
put following in.

(setenv "PATH" (concat "/usr/texbin:/usr/local/bin:" (getenv "PATH")))
(setq exec-path (append '("/usr/texbin" "/usr/local/bin") exec-path))
(load "auctex.el" nil t t)
(load "preview-latex.el" nil t t)

P.S.
If you want to swap CTRL and CAPS LOCK

Go into System Preferences, Enter the Keyboard & Mouse preference pane, In the Keyboard tab, click Modifier Keys... Swap the actions for Caps Lock and Control.

If you want to use option as META

In the menu bar, click Terminal, Click Preferences... Under the Settings tab, go to the Keyboard tab, Check the box labeled Use option as meta key.

Read more ...

Add Color to the Terminal in Mac OS X

This post is from here.


Adding colorized ls output to the Terminal in Mac OS X is a good way to make navigating around the command line a bit easier on the eyes.

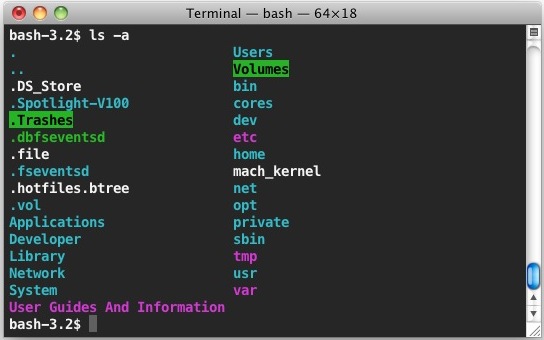
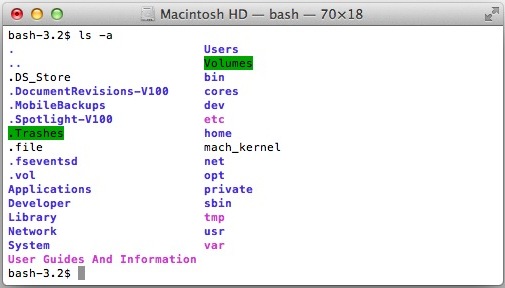
We’ll cover a customizable setting, and you can get a preview of color ls output by typing “ls -G” at the command line. The preview with ls -G will depend on the Terminals color settings and won’t necessarily represent the colors shown below, however.

Open Terminal and type: nano .bash_profile

Use the arrow keys to navigate to the bottom of the document and paste in either of the blocks of text below, depending on the terminals appearance (see man entry below for further customizations)

Colors for Dark Terminal Themes:

export CLICOLOR=1
export LSCOLORS=GxFxCxDxBxegedabagaced


Colors for Light Terminal Themes:

export CLICOLOR=1
export LSCOLORS=ExFxBxDxCxegedabagacad


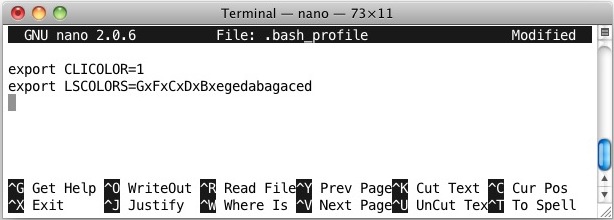
After the strings are pasted into .bash_profile confirm that it looks something like this in nano:


Hit Control+O to save and open a new Terminal window
Type "ls" or "ls -la" to confirm the colorized output

This will work with Mac OS X 10.6, OS X 10.7, and OS X 10.8, as long as you are using the bash shell. If you aren't certain what shell you are using, look in the Terminal window titlebar for "bash", or you can check with the following command:

echo $SHELL

The output will be "/bin/bash" if it's bash, and something else if not.

Don't forget that you can also change the appearance of Terminal windows instantly and change the Terminal wallpaper too.

Customizing LSCOLORS Manually

If the above color choices weren't doing it for you, you can set whatever you want. Here's the manual page on LSCOLORS if you want to give it a shot. The default is "exfxcxdxbxegedabagacad" but clearing out the .bash_profile color entry will remove any hideous color combinations too.

LSCOLORS The value of this variable describes what color to use for which attribute when colors are enabled with CLICOLOR. This string is a concatenation of pairs of the format fb, where f is the foreground color and b is the background color.

The color designators are as follows:

a black
b red
c green
d brown
e blue
f magenta
g cyan
h light grey
A bold black, usually shows up as dark grey
B bold red
C bold green
D bold brown, usually shows up as yellow
E bold blue
F bold magenta
G bold cyan
H bold light grey; looks like bright white
x default foreground or background


Note that the above are standard ANSI colors. The actual display may differ depending on the color capabilities of the terminal in use.

The order of the attributes are as follows:

1. directory
2. symbolic link
3. socket
4. pipe
5. executable
6. block special
7. character special
8. executable with setuid bit set
9. executable with setgid bit set
10. directory writable to others, with sticky bit
11. directory writable to others, without sticky bit


The default is "exfxcxdxbxegedabagacad", i.e. blue foreground and default background for regular directories, black foreground and red background for setuid executables, etc.
Read more ...

Make an alias in Mac OS X shell

1.
nano ~/.bash_profile

add you alias like following

alias l='ls -lah'

then run source ~/.bash_profile in terminal.

2.
nano /etc/profile (for a normal user)
nano ~/.profile (for a root/su do)

Add your alias like so to the file:
alias aliasname='mycommand /path/path'
(notice no space between equal sign and ')

Load/reload your profile with:
. /etc/profile
...or for root/superuser do:
. ~/.profile
Read more ...